
This is the last blog entry for a super-eventful 2013 for Incredible Web. Throughout this year we have worked on many different technologies and projects and met different people with all kinds of different backgrounds; being investors, developers or enterpreneurs; ensuring that next year is bound to be an even more important year where we could apply the knowledge we have gained and the people we have met onto your startup ideas.
In 2013 we were also ALPHA attendees at the Web Summit 2013, with our own project Bum A Lift, a car-sharing website and application which we plan to launch as a fully-functional application in the coming months and then probably look for seed or angel investors which would really help push it through the roof and hopefully become an everyday process for commuters.
Having said that, today's blog will be a little bit different; instead of picking up one large topic and going on about it, I will be discussing the coolest things that I have worked on (or read about) in the past calendar year and helping you get started on some of them.
Chrome DevTools
Chrome has gone from being a simple browser into an integral part of a web developers arsenal. Almost every web developer must have used Chrome to check styles, CSS or JavaScript; however very few utilize the full functionality that is made available, including mapping resources to file, timelines and debugging Chrome on your mobile from your desktop's browser. Whilst I cannot go into detail about each of these, I do recommend you take a look at this great video by Paul Irish.
The one I will explain briefly is how you could map CSS (and now even SASS & LESS) and JavaScript files onto your hard-disk, so whenever you make a change in your local IDE or on the browser, the changes will persist between disk and browser.
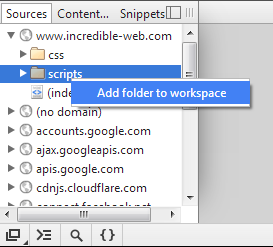
With Chrome DevTools open, navigate to the Sources tab and from the section on the left, select a folder which you wish to map onto your local drive. Right click on it, and you will be given the option to "Add Folder to Workspace".
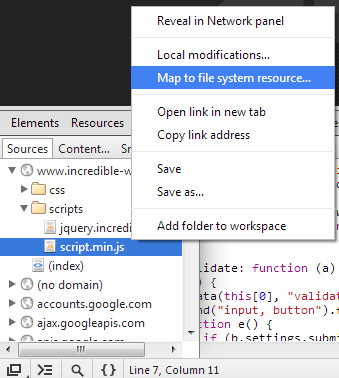
After having selected the local folder, you may be prompted to give Chrome permission to access your disk storage. Needless to say, for this experiment you will be required to allow. Once that is set up, right-clicking on a JavaScript or CSS file, you have the option to "Map to file system resource..." from where you may choose the corresponding local file.
The same procedure could also be done for SASS files, however if you are using Compass the source maps are not yet supported on Chrome (more details are available here).
CSS Preprocessors
I cannot understand how I have not yet written about CSS preprocessors, namley SASS and LESS; because I used both of them extensively and now consider them a fundamental part of my development process. I cannot really compare which is better, because even if I have used both, I cannot really pinpoint why I chose SASS over LESS. Almost anything that could be done in SASS could be done in LESS, and vice-versa; so I am not here to tell you which one is better, but if you don't use CSS preprocessors, you really should. Remember when your mum used to tell you to brush your teeth before going to bed. This is almost the same thing and there shouldn't be any excuses why you should not use preprocessors.
I use SASS + Compass; which makes my design work much more flexible; the headers of a website are a function of the background colour, for example:
background-color: lighten($theme-color2, 80%);
Tell me that that is not a beautiful piece of CSS. I decide that my $theme-color2 variable is too dark, I change it's value and the entire website gets updated, maintaining the same brightness ratios. That's the tip of the iceberg, although admittedly it's my favourite feature; the use of variables. CSS preprocessors also allow for mixins, i.e. you declare a function with it's parameters, and this outputs the CSS accordingly, for example:
@mixin background-init($imgpath,$position:0 0,$repeat: no-repeat, $color: transparent) {
    background: {
        image: url($imgpath);
        position: $position;
        repeat: $repeat;
     color: $color;
    }
}
Apart from this, your CSS could be organized neatly into separate files, called partials which upon change (if using Compass with watch) will be compiled into a single CSS file, making maintenance much simpler, yet still benefitting from the improved performance of a single CSS file. What is there not to love about this stuff?
Node.js
The next big thing in the past year for me, was Node.js. I had started reading about Node.js in it's early days, and following it without really getting my hands dirty. Now Node.js is slowly becoming the real deal, with full-stack JavaScript development becoming an option of the future. So for those of you who haven't been reading enough, let's start with a quick intro to Node.js.
In one sentence, Node.js is a web server built upon Google Chrome's V8 JavaScript engine. This means that it's possible to create a JavaScript file on your server, which upon receipt through HTTP, will be executed and the result returned back to the client. If you are familiar with web sockets, it's not too different, except this time we're using JavaScipt.
Apart from the improved performance we get by using Chrome's V8 engine, JavaScript is event-driven and synchronous, meaning that it sits idle and listens for an event. Until that event is fired, it does not consume any memory. Once the event is fired, a single thread would execute that JavaScript function and return the result. Node.js could handle multiple events simultaneously by creating a separate thread for each request. Its strength is its simplicity.
For a super simple hands-on example, assuming you have already downloaded node.js, we will create a web server which will simple return "Hello World". Before I continue, it must be noted that whenever the line begins with a dollar sign, this means that we are in the Node.js command prompt, not the node.js application.
First off, create a JavaScript file called example.js in the node directory (this could be any directory, as long as it is reachable from the node.js command prompt). In this file, write the following:
var http = require('http');
http.createServer(function (request, response) {
response.writeHead(200, {'Content-Type': 'text/plain'});
response.end('Hello World\n');
}).listen(8080);
console.log('Server started');
Then back into your node.js command prompt, run the following:
$ node example.js
This will write anything in the console, so from the above example you should see "Server started". More importantly, the above line created an http server lstening on port 8080. Opening http://localhost:8080 on your browser will as expected return "Hello World".
Whilst this is the most basic of examples, it should get your imagination flowing into the endless possibilities which could be achevied using only JavaScript. Instead of calling the web server through the browser, it will most likely be called through HTTP POST or GET, sending and receiving JSON data. In the future I wish to elaborate more on this because it is a very extensive topic and there are numerous resources available on the web, but recently I have started using ucss, GruntJS and CasperJS which all run on the node.js web server.
...and finally a Happy New Year
So what are our plans for the new year? Well as I already mentioned, we are going to continue our work on Bum A Lift, however we are expecting that in 2014 we would be more involved in other people's startups, and we would provide a platform for developers, entrepreneurs and investors to meet and work together on new ideas. Therefore as always, I encourage you to bring forward any new ideas you might have, because we are slowly building a startup community and could provide you with the necessary tools to take that big step forward.
Wishing you all a fantastic 2014 and thank you for this past year!
Kevin