What are Grunt and Gulp?
Grunt and Gulp are task runners that will help the front-end developer in his daily repetitive tasks like compressing CSS, minifying the JavaScript, optimising images...etc. Most likely you would be using Grunt or Gulp because the compressed files are smaller minimising the response payload you would only include minified files on your server. Doing these tasks manually is a waste of time and a task runner actually automates these processes improving your workflow.
Grunt and Gulp are two NodeJS plugins, found on the npm package manager.
GRUNT VS GULP
The first main difference is that Gulp is far faster than Grunt when compared for similar task. Let’s check it out with an example.
There are .scss files (the same in both cases) that need to be concatenated. We execute both grunt and gulp in the folder project:
Grunt:

Gulp:

As we can see, Gulp executes tasks faster: 1 second faster here!
2.5/1.5 = 1.6, so Gulp seems to be 1.6 times faster than Grunt!
This can be explained by the fact that Gulp’s tasks are done in parallel by default, unlike Grunt’s ones.
You can of course wait for other tasks to be finished with Gulp thanks to the options:
gulp.task('minonly', ['scripts','styles'], function () {
//code here
});
minonly wouldn’t start before the tasks scripts and styles are over.
The second difference is that Gulp is all about streams and pipelines, which makes it easier to code for the developer. Using pipelines avoids opening and closing files. This is also what explains the gap in the execution times.
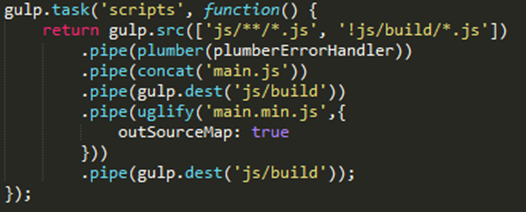
In this example, the task called 'scripts' concatenates the javascript files contained in the folder js/ (and not the subfolder build) into main.js. Then, main.js is minified and a source map is generated.
Setting up your Gulp environment from Grunt
Since Gulp is based on Node.js, a package.json file will be needed in the project folder’s root. It should first contain :
{
"name": "Project Name",
"description": "Migrating from Grunt to Gulp",
"author": "Incredible Web",
"devDependencies": { },
"dependencies": {}
}
The dependencies will be automatically added when new plugins will be locally installed.
To install Gulp, you need to open a terminal and type in the following command:
$ npm install --global gulp-cli
Then you can open a terminal in your project’s folder to locally install the plugin:
$ npm install --save-dev gulp
Just like with Grunt, Gulp needs a gulpfile.js file at the root. For each plugin you’ll be using in your project, you’ll need a variable at the beginning of this file. For instance :
var gulp = require('gulp');
How to install new plugins?
You can easily do that with the command
$ npm install --save-dev pluginName
Create a task in the gulpfile.js:
This can be done with the task method of the variable gulp :
gulp.task('nameOfTheTask', function() {
// place the code here
});
You may want to find the Gulp equivalent of the modules you were using with Grunt. Although the Grunt community support is wider than Gulp’s, you can find more than 2000 Gulp plugins on http://gulpjs.com/plugins/, and this number is getting even bigger every day.