
Let's Shake on It
You remember the days when we had to continuously make asynchronous calls to the server to check if the data has changed or been updated? Well thanks, to HTML5 and the support of web sockets in modern browsers, the client no longer had to use these polling techniques. What happens under the hood is that the client and the server handshake over the HTTP protocol to define the technologies that are going to be used throughout the connection ex Web Sockets. When the server gets new data, it can automatically push the new information to the client who's listening to the incoming data and can then use in the client browser.
SignalR is an open source .NET framework designed to make it as easy as possible for you to have this setup where the server will be pushing information to the client without being formally 'Requested' for the data. SignalR eliminates the need to build complex and sophisticated architectures to handle real-time updates and web socket communication. It allows the programmer to focus on how to process the data and give it to the user as 'Real-Time' as possible.
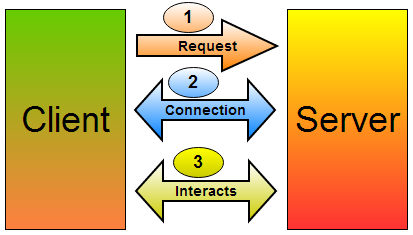
As shown in the diagram above, when a connection is initated, the client and the server 'hand shake' over the technologies which will be used during the connection. The sever and the client both check if they are using compatible versions of SignalR and agree upon a communication model which can be used such as Web Sockets. The fascinating part about SignalR is that if the web browser does not support Web Sockets, SignalR will revert to older techniques such as Long Polling to achieve virtually the same functionality but not as efficient.
What better way of expressing the awesomeness of SignalR than a real-life example?
In this blog I'm going to show you how you can easily build a chat application using SignalR in a few minutes. Lets start off by creating a new MVC 4/5 Web Application.

The SignalR framework incorporates a SignalR JavaScript library which makes use of JQuery which allows you to easily manage the client-server connections and consume the data pushed through the client. Once we have the application created, lets download the Nuget SignalR packages which includes all the server side dll's including the client-side javascript libraries we just mentioned.

You will notice the scripts automatically added to your Scripts folder in the solution and the new references to the SignalR libraries.
Next we need to create the SignalR Hub Class. This is basically the class from the server side which will push the information to the client once information is received. You can easily create this class by adding a new item to your project and choosing the 'SignalRHubClass' from the list. Add a 'Send' method to the class which will push messages to all the clients whenever a new message is received, as shown below:
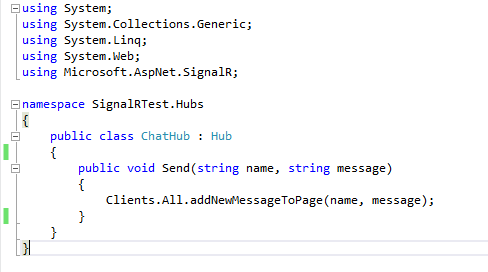
Right, so we're half way there. As you can see in the figure above, the method 'Send' within the 'ChatHub' class will propagate a call to all clients and invoke the 'addNewMessageToPage' method while passing both the name and the message as parameters.
Next we need to prepare the code from the client side. We need to create a view which will contain some basic HTML to display a username followed by the respective chat message. We would also need to set the javascript which will make a reference to the initiated Hub instance and check if there are any available messages as shown below:
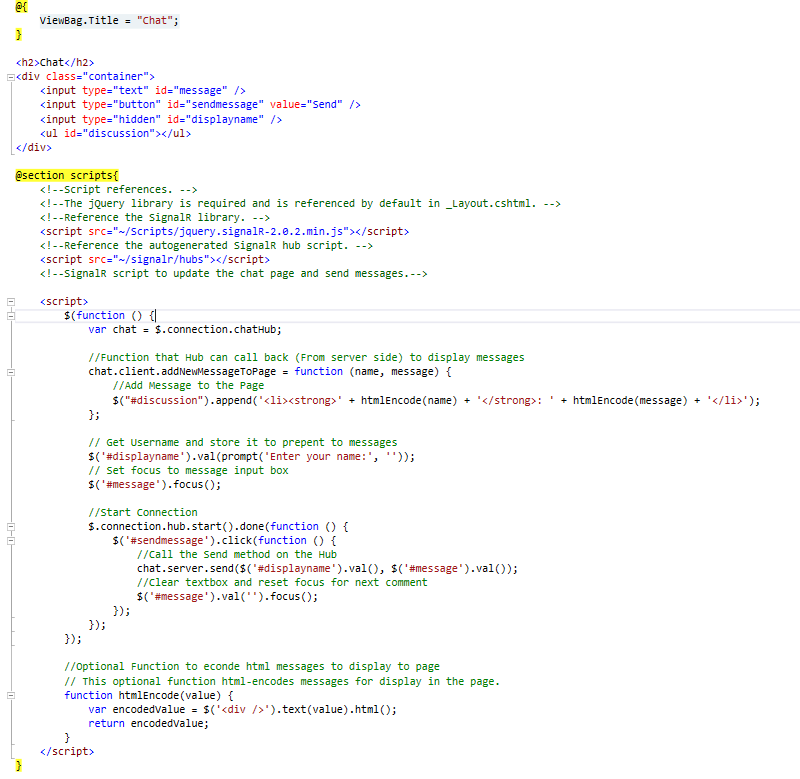
Lets go through the code above and explain what it does. So initially we're making references to the SignalR JavaScript library and the JQuery library as necessary. Then we're creating a reference to the initiated Hub in our context and calling it 'chat'. After getting the reference we're defining the functionality of the previously mentioned method 'addNewMessageToPage'. So basically whenever the hub has something to send, this is how the call will be handled from the client side. Next is some simple JavaScript code to prompt the user to input the username and to make a call to the server side hub when the send button is clicked. As you can see if we need to initiate the hub connection using the 'start()' function, and we're assigning a click event to the send button to send the 'name' and the 'message' to the server side 'Send' method which we already defined earlier in our hub class.
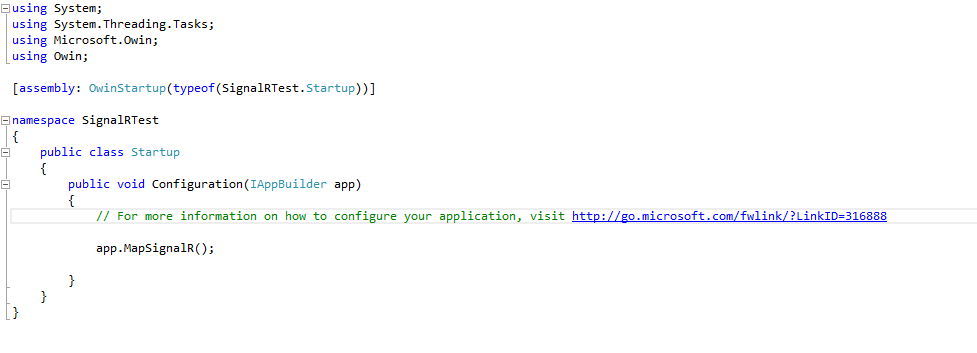
Thats it, we're almost done! Whats left is to register our hubs on our solution within our context. Since the SignalR version 2, in order to map the hubs to the current application context, we need to register an OWIN (Open Web Interface) startup class. OWIN is used to create a seperation of concerns between the server and the application in a web enviroment. I will soon write a blog about the OWIN concept but for now lets just use it to register our SignalR hubs. You can easily install OWIN onto your solution via Nuget as shown below:
PM> Install-Package Microsoft.Owin -Version 2.0.2
PM> Install-Package Microsoft.Owin.Security -Version 2.0.2
This will install OWIN on your solution and if you notice, it will also create a Startup class within your solution. This is where we can register our SignalR hubs with the current application context as shown below:
There you have it! You can test your application but opening multiple tabs of your application and see how the messages are pushed in real time to all your open tabs. You can use SignalR in any application where Real-Time information is required. In future blogs I will show you how we can build more robust Real-Time applications using SignalR, KnockoutJs and WebAPI, until then thanks for reading and feel free to leave any comments!
Thanks,
Shaun